
Are you ready, family? Halloween is just a few days away. Still wondering what gifts to get for your beloved friends and children? Perhaps you can try a different kind of Halloween magic and creativity—using carving tools to create unique holiday gifts. DIY pumpkin carving and simple handmade decorations are a unique surprise for friends and family. If you’re interested, join me and learn how to use carving tools to create personalized Halloween creations.
Step 1: Choose the Right Engraving Tool for Your Creative Journey
Before you start carving, you’ll need the right tools — and trust me, the right engraving tool can make all the difference. For beginners, a lightweight engraving pen or small carving knife set is perfect. If you’re more experienced, a full engraving tool kit with interchangeable tips gives you more control and versatility for detailed work.
Engraving tools can be used on all sorts of materials — from pumpkin skin and wood to soft plastic ornaments. They help you add fine textures, shape clean outlines, and create that “wow” effect in your final piece.
Pro tip:
If you’re a first-timer, start with simple lines and shallow cuts. For advanced creators, experiment with deeper engraving for layered effects or light carving to add shading — it’s almost like sketching, but in 3D!
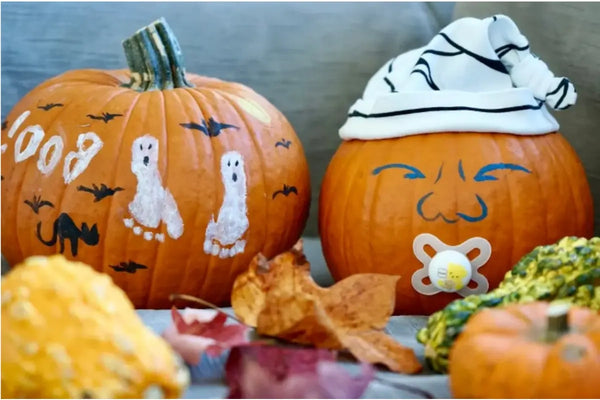
Step 2: Pick Your Halloween Carving Project
Now comes the fun part — deciding what to make! Traditional pumpkin lanterns (Jack-o’-Lanterns) are always a hit, but there’s no reason to stop there. Try your hand at engraving mini ghost charms, spooky skeletons, witch hats, or even personalized trick-or-treat name tags.
Each project brings its own creative joy. Want to add a touch of glam? Paint your designs with metallic colors or use glow-in-the-dark paint for an extra eerie effect.
DIY idea:
Carve your family’s initials or fun Halloween phrases like “Spooky Squad” or “Boo Crew” into small wooden plaques. It’s simple, stylish, and perfect for your doorstep or living room décor.
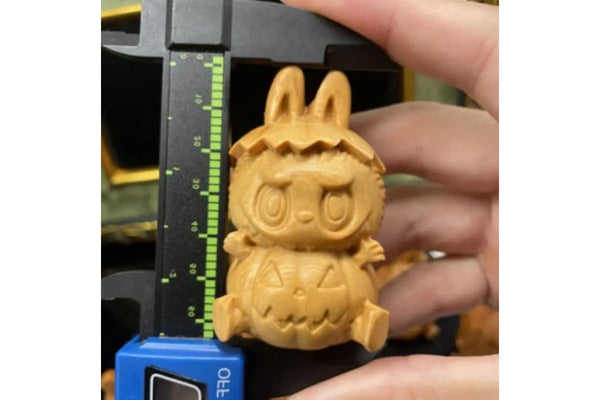
Step 3: Master the Art of Carving and Detailing
Patience is key when working with your engraving tool. Always start from the center of your design and move outward, using gentle, steady pressure. For detailed lines — like a pumpkin’s grin or a bat’s wings — use a fine engraving tip.
Make sure your hand rests on a stable surface to keep your movements precise. Don’t rush the process; carving is as much about the experience as it is about the result. Play your favorite spooky playlist, sip a pumpkin latte, and enjoy every little detail you create.
Step 4: Stay Safe While You Create
We love creativity, but we also love keeping all ten fingers intact! �� If you’re crafting with kids, supervise closely and use safer tools like dull-edged engraving pens. Always keep your workspace clean and well-lit.
✨ Safety Tips:
Keep tools away from small children when not in use.
Wear protective gloves for better grip.
Never carve while distracted (no texting mid-engrave!).
Creating art should feel joyful, not stressful — so take your time and have fun with it!
Step 5: Care for Your Engraving Tools Like a Pro
When your masterpieces are complete, it’s time to give your engraving tools some love. Proper care keeps them sharp, safe, and ready for your next creative project.
After each session, gently clean the blades or tips with a soft cloth to remove any residue. Store them in a dry place — moisture can cause rust or dull edges over time. If your tool starts to lose its edge, a quick sharpening or replacement tip will have it working like new.
Little secret:
Treat your tools like a good friend — the more care you give them, the better they’ll perform for you in return.
Step 6: Show Off Your Halloween Creations!
Once your work is done, it’s time to share your spooky-cute art with the world! Snap some pictures in natural light and post them online — people love seeing creative Halloween crafts. Tag your favorite DIY accounts, or even start a mini video tutorial showing your process with your engraving tool.
Want to go the extra mile? Host a small Halloween craft night with friends or kids. Everyone brings their own project and gets to carve, laugh, and create something memorable.
Bonus idea:
Record a short video of your engraving process and share it with your followers — show how satisfying it is to carve that final detail!
Final Thoughts: Make This Halloween Uniquely Yours
Halloween is all about imagination, fun, and sharing joy. Using an engraving tool from Katway isn’t just about carving — it’s about turning ordinary materials into something magical. You don’t need to be an artist; you just need curiosity and a little Halloween spirit.
So this year, instead of buying mass-produced decorations, create something that reflects you. Whether it’s a smiling pumpkin, a hand-engraved ornament, or a spooky jewelry charm, your handmade art will bring warmth and laughter to everyone around you.
Grab your engraving tools, cue up your favorite ghostly tunes, and let’s make this Halloween sparkle — one carved masterpiece at a time.